Understanding SMS Buttons
SMS-Magic gives you the ability to send SMS messages from page layouts (individual object records), search layouts (send bulk SMS messages to a list of object records) and from Campaigns (send bulk SMS messages to campaign members).
To add a Send SMS button to an object, the records of that object must have a mobile number. If the mobile number is present in the object, that mobile number can be retrieved with a formula field. For example, let’s say you need to set up a Send SMS button on an Opportunity and the mobile number is present in Accounts. In this case, you can create a formula field on the Opportunity object, which will pull up the mobile number from the Accounts object.
There are two interfaces available for sending SMS from page/search layouts:
Pop up (not available on Campaigns) - this option is configurable by adding a parameter in the button code.
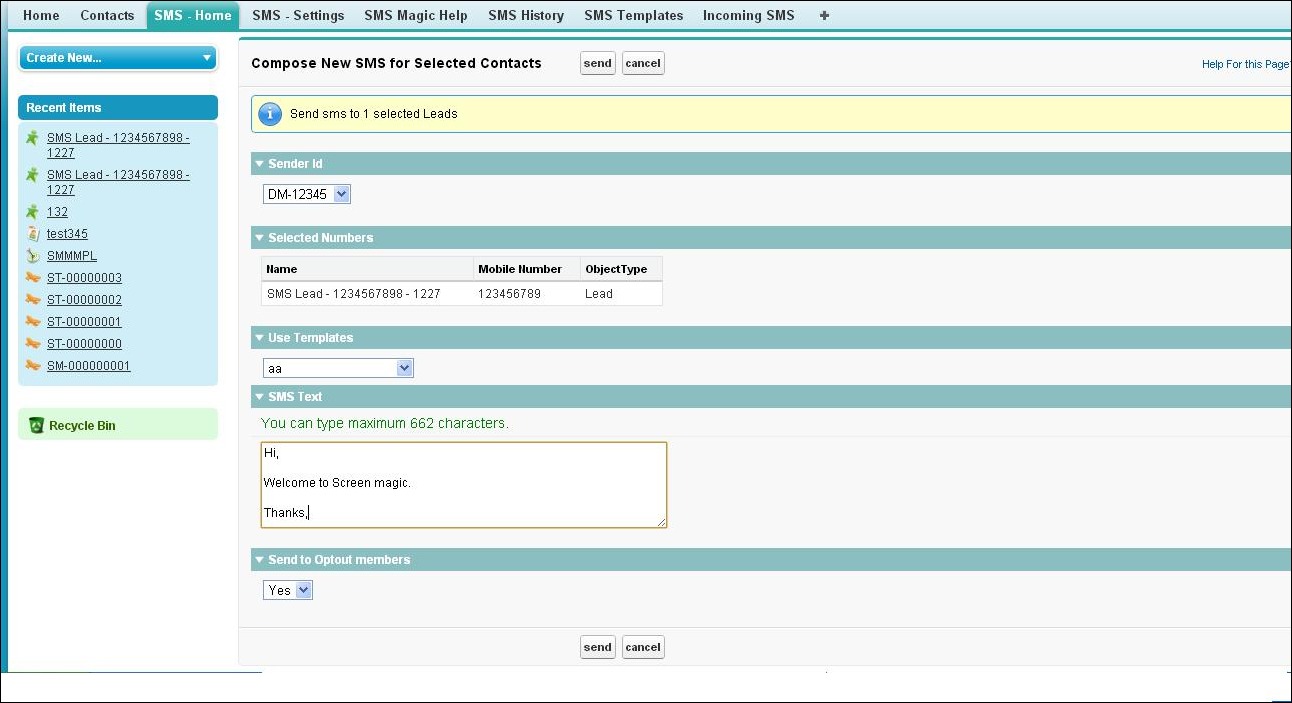
Visualforce page - available on page layouts, search layouts, campaign layout.
The detailed steps for setting up Send SMS buttons are explained in the sections below.
Configure the Send SMS button for Leads & Contacts
Send SMS buttons are pre-configured for the Standard Objects (Leads & Contacts), you just have to add them to the page layouts. These buttons use the standard mobile phone field to send SMS. In case you need to use any other field for sending SMS, you have to create new buttons.
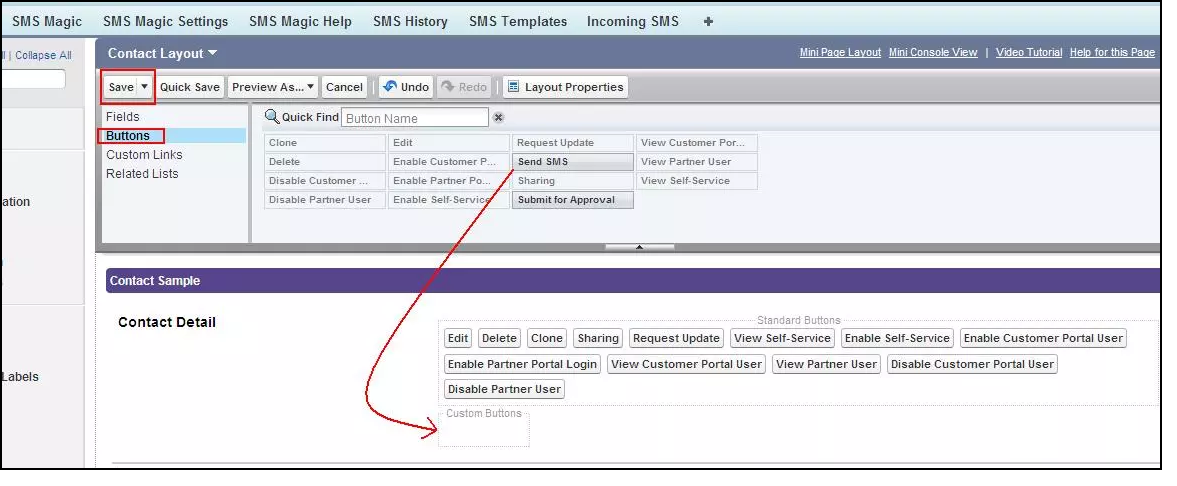
To add the Send SMS button to the page layout of a standard object (in this case Leads), follow these steps:
1.Navigate to App Setup > Customize > Leads > Page Layout.
2.Click Edit on the page layout to which you want to add the Send SMS button.
3.From the Buttons tab, drag-and-drop the Send SMS button to the Custom Buttons space in Contact Detail.
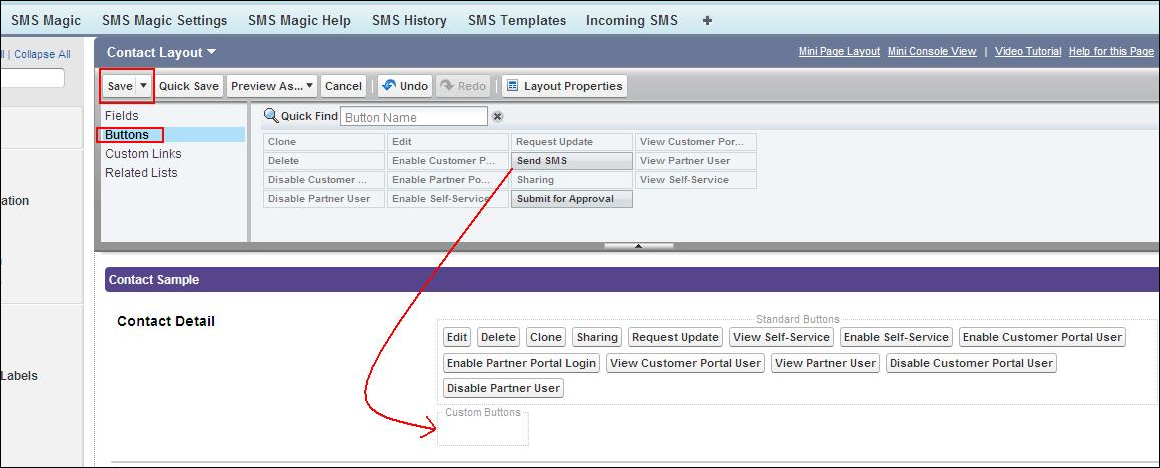
4.Click Save, and you can now see the Send SMS button on the page layout of any lead record.
Configure Send SMS / Send Bulk SMS buttons for Leads & Contacts to send SMS from a Custom Field (other than Mobile Number Field)
You can send a SMS message even if the mobile numbers are stored in a field other than the Mobile number field (the Phone field) of a Leads or Contacts object. To accomplish this, you must create a Send SMS or Send Bulk SMS button that will retrieve the mobile number from the custom field prior to sending the SMS message.
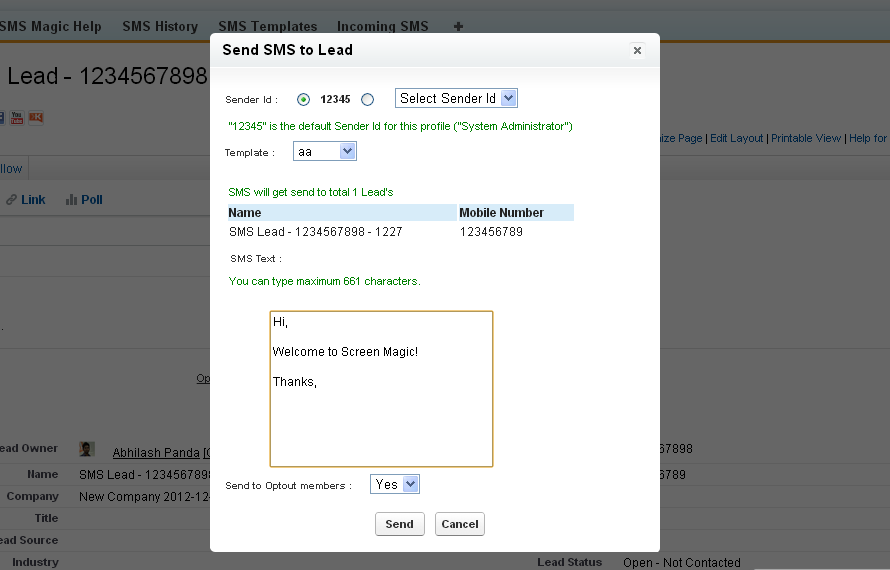
“Send SMS” button for mobile number stored in the custom field “Phone” on the Contacts object.
Normally, creating a button that will retrieve the mobile number from a custom field only requires a small change in the button code. However, the Send SMS and Send Bulk SMS buttons are already configured for standard objects and their code is not editable. So, it’s necessary to create a new button.
Follow these steps to create a Send SMS from Phone button for the Leads object:
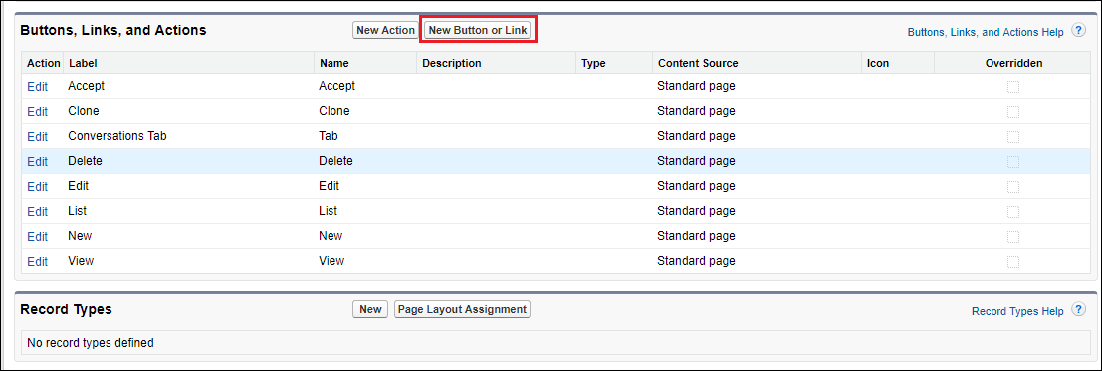
1.Navigate to Setup > Customize > Contact > Buttons & Links.
2.In Buttons, Links and Actions, click New Button or Link.

3.Enter the information, including the Label, Name, and Description. Though you can leave the label as “Send SMS”, it’s best that you give this new button a distinct label such as “Send SMS from Phone”.
•Set the Display Type as Detail Page Button.
•Set the Behavior to Execute JavaScript.
•Set the Content Source to OnClick JavaScript.
4.Copy and paste the code below into the code field for the Send SMS button. For this button to retrieve the mobile number from a custom field (in this case “Phone”) ensure that the parameter mobileField = “Custom Field Name” .
{!REQUIRESCRIPT("/soap/ajax/14.0/connection.js")}
{!REQUIRESCRIPT("/soap/ajax/14.0/apex.js")}
{!REQUIRESCRIPT('/resource/smagicinteract__smJQuery/js/jquery-1.10.2.js')}
{!REQUIRESCRIPT('/resource/smagicinteract__smJQuery/js/jquery-ui-1.10.4.custom.min.js')}
{!REQUIRESCRIPT("/resource/smagicinteract__sendSMSJS")}
var packagePrefix = "smagicinteract__";
var recordType = 'contact';
var idToUpdate = '{!Contact.Id}'
var nameField = 'Name';
var mobileField = 'Phone';
var optOutField = 'smagicinteract__SMSOptOut__c';
var optOutDefaultValue = 'yes';
var smsType = '';
var userId = '{!$User.Id}';
var elementIdVar = '';
var showUserDropDown = false;
var dialogTitle = '';
var cssUrl = '{!URLFOR('/resource/smagicinteract__smJQuery/css/sm-theme/jquery-ui-1.10.4.custom.min.css')}';
sendSMS(recordType, idToUpdate, userId, nameField, mobileField, optOutField, optOutDefaultValue, smsType, elementIdVar, packagePrefix, showUserDropDown, dialogTitle, cssUrl);
5.Click Check Syntax. A message “No syntax error in merge fields or functions ” will appear
6.Click Save, and your Send SMS from Phone button will be created.
7.Add this new button to the Page Layout.
•Navigate to App Setup > Customize > Leads > Page Layout > Edit > Buttons.
•Drag-and-drop the Send SMS from Phone button to the custom buttons area and click Save.
"Send Bulk SMS” button for mobile number stored in the custom field “Phone” on the Leads object
Similar to the instructions given in the section above, you can create a Send Bulk SMS from Phone button. The differences will be:
1.The Display type should be set to List Button.
2.It will be necessary to add this new button to the Search Layout.
Ensure that the parameter mobileField = ‘Custom Field Name’. The code for a Send Bulk SMS button is given below:

{!REQUIRESCRIPT("/soap/ajax/10.0/connection.js")}
{!REQUIRESCRIPT("/soap/ajax/14.0/apex.js")}
function loadJqueryDynamically(){
var newscript = document.createElement('script');
newscript.type = 'text/javascript';
newscript.async = false;
newscript.src = '{!URLFOR('/resource/smagicinteract__smJQuery/js/jquery-1.10.2.js')}';
(document.getElementsByTagName('head')[0]||document.getElementsByTagName('body')[0]).appendChild(newscript);
var newscript1 = document.createElement('script');
newscript1.type = 'text/javascript';
newscript1.async = false;
newscript1.src = '{!URLFOR('/resource/smagicinteract__smJQuery/js/jquery-ui-1.10.4.custom.min.js')} ';
(document.getElementsByTagName('head')[0]||document.getElementsByTagName('body')[0]).appendChild(newscript1);
var newscript2 = document.createElement('script');
newscript2.type = 'text/javascript';
newscript2.async = false;
newscript2.src = '{!URLFOR('/resource/smagicinteract__sendSMSJS')}';
(document.getElementsByTagName('head')[0]||document.getElementsByTagName('body')[0]).appendChild(newscript2);
newscript2.onload = showPage;
}
loadJqueryDynamically();
function showPage() {
var records = {!GETRECORDIDS($ObjectType.Contact)};
if (records[0] == null){
alert("Please select at least one contact.")
}
else{
var packagePrefix = "smagicinteract__";
var recordType = "Contact";
var recordIds = "";
var nameField = 'Name';
var mobileField = 'Phone';
var optOutField = 'smagicinteract__SMSOptOut__c';
var optOutDefaultValue = 'yes';
var smsType = '';
var userId = '{!$User.Id}';
var elementIdVar = '';
var showUserDropDown = false;
var dialogTitle = '';
var queryString = '';
for (var n in records) {
if(n == 'remove' || n == 'indexOf') continue;
recordIds = recordIds + records[n];
if (n != records.length-1) {
recordIds = recordIds + ",";
}
}
var cssUrl = '{!URLFOR('/resource/smagicinteract__smJQuery/css/sm-theme/jquery-ui-1.10.4.custom.min.css')}';
if({!$Permission.smagicinteract__AllowToSendBulkMessage}) {
sendSMS(recordType, recordIds, userId, nameField, mobileField, optOutField, optOutDefaultValue, smsType, elementIdVar, packagePrefix, showUserDropDown, dialogTitle, cssUrl);
}
else {
alert('You cannot Send SMS. Please contact system admin');
}
}
}
/*
Details of parameters which can be modified :
recordType - include the object API name.
mobileField - use the field name which contain mobile phone of the record.
optOutField - use the field which contains opt out preference of the record.
smsType - this parameter can be used to sepcify the type of interface required. For Visualforce page, it should be left blank. For popup, its value should be 'popup'.
dialogTitle - you can mention the name of pop up dialogue box in this parameter.
*/
Configure a Send Bulk SMS button for a Custom Object
The Send Bulk SMS button requires a mobile number field. The field in which mobile number is present can be used in the button code.
Step 1 — Create a Send Bulk SMS Button for a Custom Object
Follow these steps to configure a Send Bulk SMS button on the Accounts object:
1.Go to Setup > Objects > [object name].
2.In the Custom Buttons and Links section, click New Button or Link.
3.Enter the information, including the Label, Name, and Description.
•Set the Display Type as Detail Page Button.
•Set the Behavior to Execute JavaScript.
•Set the Content Source to OnClick JavaScript.
4.Copy and paste the code below into the code field for the Send Bulk SMS button. You can change the parameter smsType to toggle between the Visualforce page or a popup window. If you want to use a VF page, use a blank value for this parameter, such as var smsType = ‘‘;
5.Click Check Syntax. The message “No syntax error in merge fields or functions.” will appear.
6.Click Save and your Send Bulk SMS button will now be available.
{!REQUIRESCRIPT("/soap/ajax/10.0/connection.js")}
{!REQUIRESCRIPT("/soap/ajax/14.0/apex.js")}
function loadJqueryDynamically(){
var newscript = document.createElement('script');
newscript.type = 'text/javascript';
newscript.async = false;
newscript.src = '{!URLFOR('/resource/smagicinteract__smJQuery/js/jquery-1.10.2.js')}';
(document.getElementsByTagName('head')[0]||document.getElementsByTagName('body')[0]).appendChild(newscript);
var newscript1 = document.createElement('script');
newscript1.type = 'text/javascript';
newscript1.async = false;
newscript1.src = '{!URLFOR('/resource/smagicinteract__smJQuery/js/jquery-ui-1.10.4.custom.min.js')} ';
(document.getElementsByTagName('head')[0]||document.getElementsByTagName('body')[0]).appendChild(newscript1);
var newscript2 = document.createElement('script');
newscript2.type = 'text/javascript';
newscript2.async = false;
newscript2.src = '{!URLFOR('/resource/smagicinteract__sendSMSJS')}';
(document.getElementsByTagName('head')[0]||document.getElementsByTagName('body')[0]).appendChild(newscript2);
newscript2.onload = showPage;
}
loadJqueryDynamically();
function showPage(){
var records = {!GETRECORDIDS($ObjectType.Account)};
if (records[0] == null){
alert("Please select at least one account.")
}
else{
var packagePrefix = "smagicinteract__";
var recordType = "Account";
var recordIds = "";
var nameField = 'Name';
var mobileField = 'Phone';
var optOutField = '';
var optOutDefaultValue = 'yes';
var smsType = 'popup';
var userId = '{!$User.Id}';
var elementIdVar = '';
var showUserDropDown = false;
var dialogTitle = '';
var queryString = '';
for (var n in records){
if(n == 'remove' || n == 'indexOf') continue;
recordIds = recordIds + records[n];
if (n != records.length-1){
recordIds = recordIds + ",";
}
}
var cssUrl = '{!URLFOR('/resource/smagicinteract__smJQuery/css/sm-theme/jquery-ui-1.10.4.custom.min.css')}';
if({!$Permission.smagicinteract__AllowToSendBulkMessage}){
sendSMS(recordType, recordIds, userId, nameField, mobileField, optOutField, optOutDefaultValue, smsType, elementIdVar, packagePrefix, showUserDropDown, dialogTitle, cssUrl);
}
else{
alert('You cannot Send SMS. Please contact system admin');
}
}
}
Step 2 — Adding the buttons to Search Layouts
The Send Bulk SMS button that you created following the instructions in Step 1 must now be added to the page layout for the objects:
1.Go to Setup > Objects > [object name].

2.Add it to the search layout and click Save, and the Send Bulk SMS button now is ready to be used in any Accounts record.
Configure Send SMS / Send Bulk SMS buttons for Custom Objects (Objects other than Leads & Contacts) to send SMS from a Custom Field (other than Mobile Number Field)
You can send a SMS even if the mobile numbers are stored in a field other than the “Mobile” number field (e.g.: the “Phone” field) in any object. In case of custom objects, we can create a Send SMS or Send Bulk SMS button that will fetch the mobile number from the custom field before sending the SMS in two ways:
•Edit the existing button code
•Create a new button
Edit the existing button code
For a button that will retrieve the mobile number from a custom field, it is only necessary to make a small change in the button code. In the button code for either a Send SMS or Send Bulk SMS button, the mobileField parameter defines the destination of the mobile number. Ensure that this parameter is set to the custom field name from where the mobile number is to be retrieved. If, for example, the mobile number is stored in the Phone field, then mobileField = “Phone”.
Create new button
You can also create a new Send SMS from Custom Field or Send Bulk SMS from Custom Field button. To create a new Send SMS from Custom Field button, refer to Send SMS Button for Custom Objects section above. When creating this new button, it’s important to ensure that:
•The mobileField parameter = “Custom Field Name” in the button code.
•The newly created Send SMS from Custom Field button is added to the Page Layout.
To create a new Send Bulk SMS from Custom Field button, refer to the Send Bulk SMS Button for Custom Objects section above. When creating this new button, it’s important to ensure that:
•The mobileField parameter = Custom Field Name” in the button code.
•The newly created Send Bulk SMS from Custom Field button is added to the Search Layout.
Configure a Run SMS Campaign button for Campaigns
With Campaigns, a SMS message can be sent to up to 500,000 records. Compare this with the Send Bulk SMS option that permits a SMS message to be sent to only 200 records at a time.
To send a SMS message from Campaign, do the following:
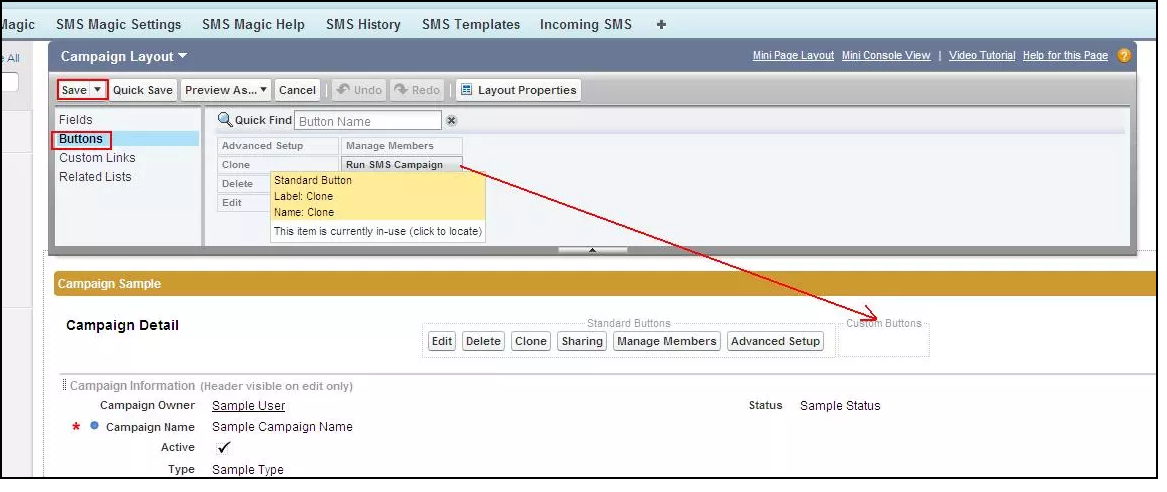
1.Create a Campaign (Salesforce Standard) and add members to it. Remember that only Leads and Contacts can be added as members.
2.Configure a Run SMS Campaign button on the Campaign Object. To do this, navigate to Setup > Customize > Campaigns > Page Layout > Edit. From Buttons, drag-and-drop the Run SMS Campaign button to the space provided for custom buttons.
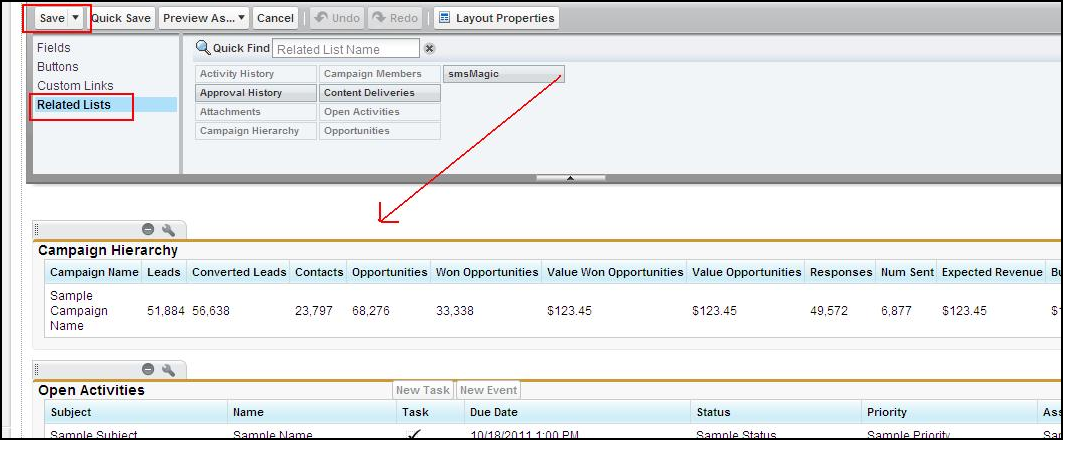
3.To add the SMS History related list, navigate to Setup > Customize > Campaigns > Page Layout > Edit and drag-and-drop the smsMagic related list to the page layout and click Save.
4.Select a campaign and click the Run SMS Campaign button to send the SMS message to all members.
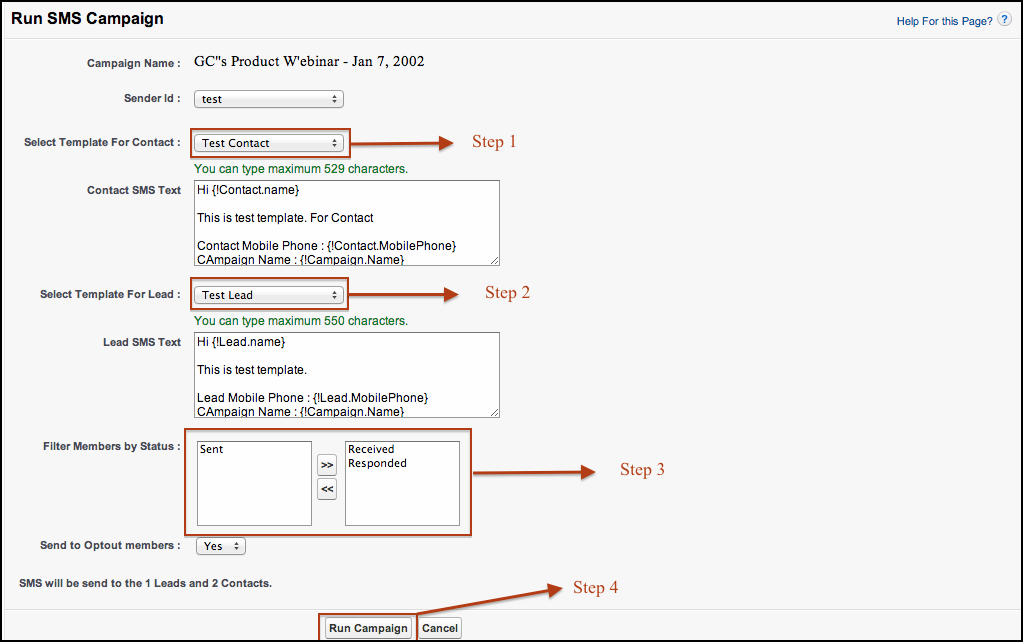
5.Next, you have the option to select a template for Contacts and for Leads separately. Select the appropriate template.
6.Select the status of Campaign members (Leads & Contacts) to whom you want to send a SMS message to filter the records. (This step is mandatory).
7.Click the Run Campaign button, which will send the SMS message to all of the chosen members.
Configure a Run SMS Campaign from Custom Field button for Campaigns
You can configure a Run SMS Campaign button that will send an SMS message to mobile numbers that are saved in custom fields such Phone or Alternate Mobile Number. For this, we need to create a new Run SMS Campaign from Custom Field button.
Follow the steps below to create a button that will send an SMS message to the mobile numbers stored in the custom Phone field of the Campaigns object:
1.To create a new button, go to Setup > Customize > Campaigns > Buttons, Links & Actions and click New Button or Link.
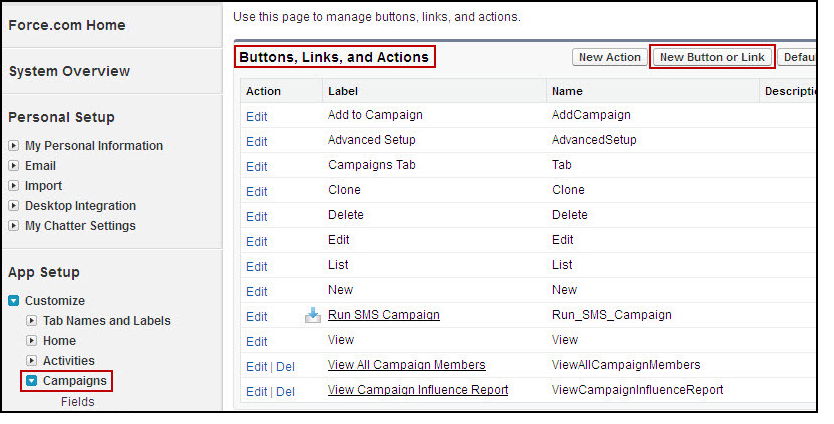
2.Enter the information, including the Label, Name, and Description.
•Set the Display Type as Detail Page Button.
•Set the Behavior to Execute JavaScript.
•Set the Content Source to OnClick JavaScript.
3.Copy and paste the code below into the code field.
{!REQUIRESCRIPT("/soap/ajax/14.0/connection.js")}
{!REQUIRESCRIPT("/soap/ajax/14.0/apex.js")}
var packagePrefix = "smagicinteract__";
var recordType = "campaignmember";
var idToUpdate = "{! Campaign.Id }";
var leadPhoneField = "MobilePhone";
var contactPhoneField = "MobilePhone";
var optOutDefaultValue = 'no';
if({!$Permission.smagicinteract__AllowToSendCampaignMessage}) {
var queryString = parent.window.location.pathname;
if (parent.window.location.search){
queryString = queryString + parent.window.location.search
}
var url = "/apex/"+packagePrefix+"CampaignSMSSendPage?retURL="+queryString + "&objectType="+recordType+"&recordIds="+idToUpdate+"&optOutDefaultValue="+ optOutDefaultValue+"&leadPhoneField="+leadPhoneField+"&contactPhoneField="+contactPhoneField ;
parent.window.location = url;
}
else{
alert('You cannot Run SMS Campaign. Please contact system admin');
}
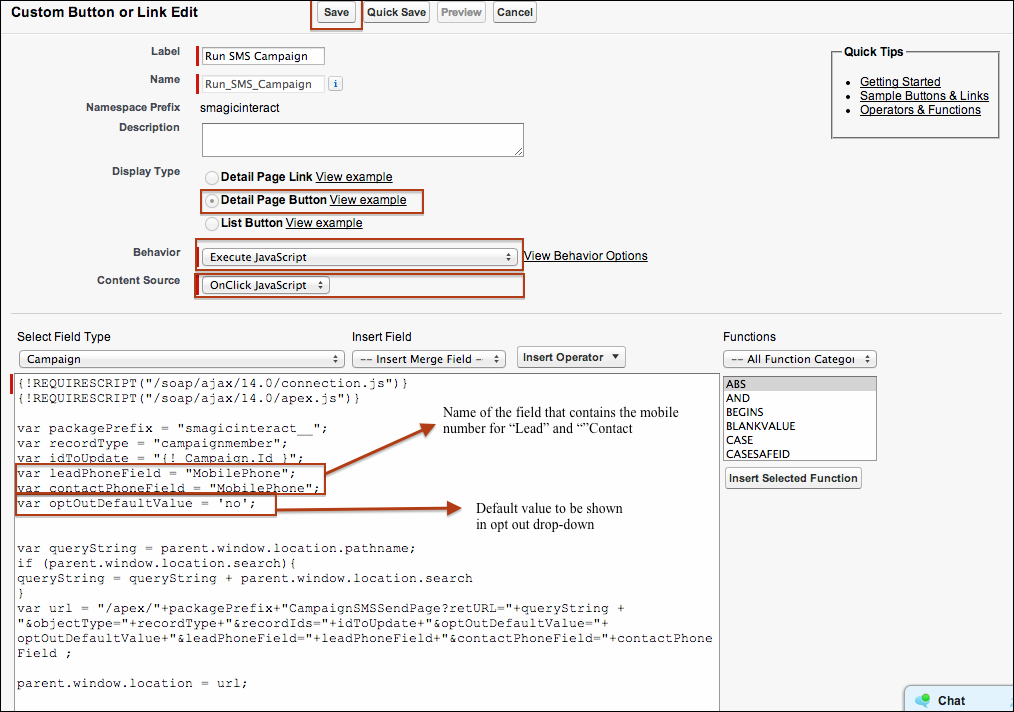
4.The leadPhoneField and contactPhoneField parameters define the destination of the stored mobile numbers to which an SMS message is to be sent. It’s important to ensure that these parameters are set to the custom field from where the mobile numbers are to be retrieved. That is, leadPhoneField = “Phone” and contactPhoneField = “Phone” — in which “Phone” is the custom field.
5.Check syntax for errors. When a message “No errors in the merge fields or functions” appears, click on Save to create the button .
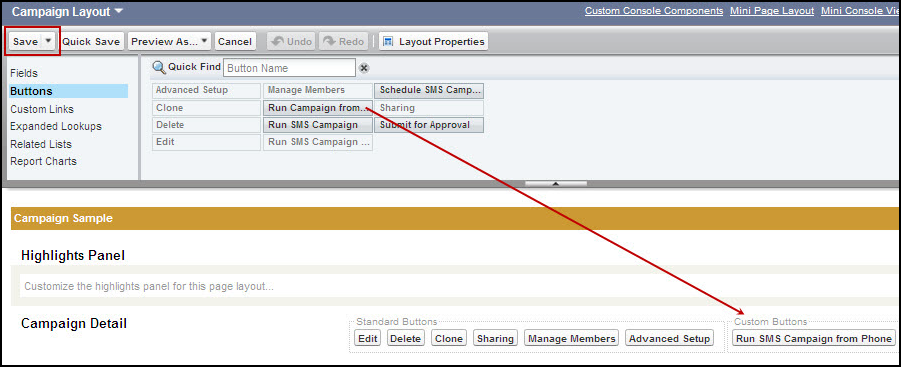
6.Add this new button to the Page Layout.
7.Go to App Setup > Customize > Campaign > Page Layout > Edit > Buttons.
8.Drag-and-drop the Run Campaign from Telephone button into the custom buttons area.
9.Click Save.
Send SMS to up to 3 phone number fields, using a Send SMS button
SMS-Magic Interact (Jun’15) permits a users to send SMS up to 3 phone numbers using a Send SMS button.
If a user chooses multiple fields, every number will receive a SMS message and a corresponding number of credits will be deducted.

You can try the following:
1.Navigate to Setup > Customize > Buttons, Links & Actions.
2.Click Send SMS Script.
3.Change ‘var mobileField’ to be = ‘MobilePhone,Phone,Fax’.